Thursday 30 June 2022

13. Locked and Loaded

 I think now's a good time to simply hand the model over to a four year old child suitably armed with crayons and brightly coloured paints, then let them take it to nursery for a play day, or to put it another way, now is a good time to fire up another starting point and paint bright white patches all over this rusty wreck of a Sherman tank, and at the same time let's try and forget that all the previous starting points are still unfinished, we are now in effect layering unfinished work on top of...unfinished work, call me a cynic if you want, but I got a gut feeling this ain't gonna end well.


 But anyway, I decided that I wanted bright vivid colours all over this rusty wreck simply because the graffiti guys (artists?) started with bright vivid colours, so it seemed like a good place to start, but unbeknown to me my Tamiya paints had already decided that the words bright and vivid were not in their job description, and instead tended to favour washed out looking nonsense, so I sacked the both of them (yellow and orange) and hired Winsor&Newton artists oils instead, and it has to said that this one decision has now caused an ever spiralling number of problems that I might, or might not discuss later in this post.


 Picture below, Tamiya yellow and orange got layered on top of the base white patches in the appropriate places but just resulted in washed out colours (mainly the yellow) and to be fair to Tamiya paints both yellow and orange are notorious for being a little bit troublesome, maybe white was not the best thing to start from, I'm inclined to blame my lack of painting ability rather than the Tamiya paints.

  But anyway, cadmium yellow and cadmium orange were quickly layered on top of the Tamiya paints and this resulted in much better and brighter vivid colours, to the point that you could maybe dazzle a rabbit from three miles away, but of course the downside is that artists oils take a lot longer to dry, I should of just stuck with acrylics or even enamels to be honest


 Picture below, the white patch on the upper hull near the engine deck is for the MMIX graffiti that will be added at some point when I can be bothered, and will then get weathered down so that it is barely recognisable hopefully, I'm not keen on it but it adds a bit of interest I suppose, and yellow patch on the rear plate will morph into the Culebra flag at some point, and will also get heavily weathered, and the WTF? graffiti will have to be moved somewhere else. 


 Picture below, the orange patches on the turret had their edges feathered in to give them a more weathered look and make them look a lot less precise, this was done with the base burnt umber acrylic and a teeny tiny brush, and these feathered edges still need to be blended back in with a pastel wash, and then the sandy patches overlaid on top, and all of the colour patches will be feathered in like this when I get round to it.


  At this point in the build all hell broke loose, masking hell to be more precise, and it has to said that any smart cookies who are stupid enough to still be reading this load of old nonsense will already know what the problem is - you can't put masks on top of oil paints and expect them to stick well, plus we are working on a curve and the surface is very rough (the masks probably work a lot better on smooth surfaces) I waited about a week and a half for the oil paint to dry, and that was not even close to being long enough...lol


 So, the turret fishbone graffiti on this side of the turret is a mixture of hand painting and masking, I managed to get the mask to stick for just long enough to go in there and outline it with black artists oils (I never learn my lesson, I figured it would be more stable and have less chance of seeping under the mask, there was no way in hell the mask was staying put for long enough to do any airbrush nonsense) And then I just infilled with some delicate brush painting, made a cup of tea and lost the will to live.

 It all still needs to be weathered in, faded, dusted over, nothing is finished, or even remotely close to being finished for that matter, I basically just have colour and a reasonable fishbone graffiti, I'll sort the rest out later...


 Matt


Wednesday 29 June 2022

12. The No Plan, Plan


  When I first started this Culebra beach Sherman build I didn't really have much in the way of a plan to be honest, either with regards to painting the rust and corrosion or the general style and layout of the very colourful graffiti, I was just kinda making it all up as I went along, and I tend to call it the no plan...plan, I'll worry about it all later when I get there maybe, that kinda thing, well not anymore, I've decided that now is a damn good time to come up with a plan, It's a very vague plan, but at least it's a plan...


  Pictures above, I've decided to do the white patches on the turret in a very heavily weathered fashion, with the edges of the patches looking very rough and the white paint turned a very vivid orange colour from all the rust, like the picture on the left, and so the yellow and green spiral graffiti on the hull side will also have to be heavily weathered to match, like the picture on the right.


 Pictures above, I've also decided to do the MMIX that can be seen on the hull near the engine deck (left picture) even though I really don't like it all that much, but it's better than nothing there I suppose, and on the rear plate (right picture) I've decided to do the yellow and green Culebra flag? Because I think it looks kinda cool and will liven up the rear hull plate which looks very plain and slightly boring at the moment.


 The WTF? graffiti (left picture) which I like very much for obvious reasons and don't want to lose will therefore have to be moved somewhere else on the hull or turret, I'm not really sure where just yet, maybe on the back of the turret if the painting mask will fit there, I would much rather have a nice colourful flag on the back plate (right picture) but I'm not exactly confident with regards to doing the image of Culebra island in the middle of the flag as an outline, so will probably just bodge it as a solid splodge of colour, and if it looks naff then I'll just cover it with rust...lol

 So that's the vague plan, all heavily weathered to within an inch of its life, and it should be noted at this point in time that all of this vague plan is subject to change depending on my ability to actually paint it.


 Matt


Tuesday 28 June 2022

11. Still Living By The Sea

 Time to put the suspension and wheels back on this load of old silly nonsense that I sometimes jokingly call a model, It's been so long since I cut them all off that I can't even remember why I cut them off, probably something to do with painting, probably to make it easier to paint the backs of all the wheels and suspension units with an airbrush, but anyway, spacers were made from plastic card to replace the missing plastic that I butchered out with a Mini-craft tool, and things got glued back on, and then a few wheels got taken off again...


 Picture above, this is what the suspension and wheels looked like long ago, and at the time I just threw the wheels on wherever I could, and as quickly as I could, mostly just to get a quick picture, and the other side was only partially done if I remember correctly, so it's fair to say that things don't look much like this anymore, and this time I've made an effort (but not too much effort) to transition the corrosion and carnage towards to the front, as that's kinda how it is on this Culebra beach wreck, so we get more tyres and slightly less damage at the back end, and then all hell (in terms of damage and corrosion) breaking loose towards the front end.


 Picture above, while putting the suspension and wheels back on I also finished painting the bottom of the lower hull, this area was a complete disaster zone of epic proportions to be honest, there was bare plastic, Mr Surfacer and all kinds of nonsense on the hull bottom, mainly because I was using this area as a test zone, so I tidied it all up and blended everything in.


 Pictures above, and we ended up with this, which is basically some heavily damaged and corroded HVSS suspension on both sides of my very rusty/dusty brown and orange Sherman tank, some of the wheels on the left hand side will be buried in sand on a base (hopefully/maybe) and so they won't be visible and don't really matter all that much to be honest, It depends on how much I decide to bury the damn thing in sand I suppose...


 Pictures above and below, this is what happens when you go a little overboard with rusty dusty using very light pastels and sand that has been through the mortar n pestle, but don't worry, nothing is fixed in place, it mostly just brushes off again, and after looking at these pictures I maybe wish that I had stayed with Tamiya NATO black, which would leave the tyres with a more greyish sun faded and bleached look, which I think I prefer to be honest, but I suppose I can always lighten them up later if I want.


 Picture below, the small stand that I scratched from plastic card a while back to hold the model at an angle had to be enlarged somewhat as things were getting a little wibbly wobbly now that the suspension and wheels are back on, the new base will probably morph into something that might or might not involve sand, we shall see.

Picture below, the tyres worked out quite well I think in terms of damage and the bits of tyre that have come away in chunks, this is about the only time that separately moulded tyres in a model kit are of any use I think, so well done Dragon, all is forgiven.


 And that's about it for now, the picture above shows that I'm still messing around trying to do sun baked sandy patches with artists oils, without much success it has to be said, I've managed to do two that I actually vaguely like, It seems to be hard to get consistent and repeatable results, It's all a bit hit n miss at the moment, with more miss than hit, but the whole tank is covered in these sandy patches so I need to stop drinking shandy, put my big boy pants on, and get it sorted out sometime soon(ish) but anyway, I'm starting to quite like this load of old rusty nonsense now, It's kinda growing on me slowly, a little bit like rust.


 Matt


Monday 27 June 2022

10. Under The Pressure

  Now is a good time to do some chaos corrosion painting on the upper hull and turret using artists acrylics and pastel washes, It's basically the same technique that was used on the lower hull and the wheels and suspension, several thick coats of stippled thick body acrylic with various different pastel washes then applied on top, the picture below gives a good idea of what we are aiming for in terms of chaos corrosion painting, this particular tank hull has been left on a beach in Grimsby of all places, I'm not quite sure what it is, but it's a British C something that's for sure.


 In terms of the paints being used for this build the picture below shows that so far I really haven't used all that much in the way of painting products, which I tend to regard as a good thing, and I'm steering well clear of all those heavily marketed products (for reasons that I'll keep to myself if you don't mind) and instead focusing on painting products that can be purchased from your local art shop, you should support your local art and model shops, because you will miss them when they're gone.


 The mortar and pestle in the picture on the right is simply for creating a very fine pastel dust, when you run very fine builders sand (sharp sand) through a beige coloured mortar and pestle you get a very good sandy coloured dust, which is damn handy for a build like this, but anyway, the upper hull and turret got hit with the same stippled coats of Daler-Rowney (heavy body) burnt umber acrylic mixed with a medium rust coloured pastel chalk, It needs two or three coats to get a good base coverage, which takes some time, but not too bad to be honest as it's fast drying stuff, then I just left it for a day or so, ready for some pastel and oil washes.


 Pictures above, and talking of washes, the picture on the left shows a medium rust pastel wash using Tamiya X-20A thinner as a fixing agent, applied mostly all over, but in a varied kind of way so as to create a faded patchy look, then it got zapped with a hair dryer for a few mins to dry it all, and then another wash, this time with oils, mostly Windsor and Newton Cadmium Orange (water mix type) this was applied very sparingly and only in certain areas, not an all over wash like the first one, this wash was done quite a few times to try and build up some colour, and because it's a lot of fun.


 Pictures above and below, now my terrible attempts at sandy patches can be seen, though It does have to said that the camera is showing these as almost bright white, which they are not, they are a very light sandy brown colour, and were done with Naples Yellow, but It is fair to say that they need quite a lot more work, they need the high spots picking out with a much darker colour, and a lot more blending in work, It's all still very much work in progress, and about the only thing I'm happy with at the moment is the sandy patch around the gun barrel.


 The main reason for chucking some paint on the damn thing was to check the surface texture, to get a rough idea of whether it's in the right ball park or not, and in that regard I'm fairly happy with how the texturing turned out to be honest, there is a certain element of complete random chaos going on, and I'm very happy with how the turret turned out, plus the lower hull turned out reasonably well, and the upper hull maybe not so much, It maybe needed more chaos corrosion on the front plate, but then the front plate will hopefully be getting a layer of seaweed/slime/algae nonsense at some point, so it probably doesn't matter that much.


 Picture below, the whole thing now badly needs a wash to darken it all down a bit, all the weathering effects have lightened it up quite a lot, and as can be seen in the picture the engine bay badly needs to be sorted out, it's a focal point, a very big focal point to be honest, and therefore needs some work, It badly needs some interest adding in the form of old junk metal, some more fine detail adding, maybe some engine mounts, that kind of thing, and a big pile of sand for the crabs to play in of course.


 I'm starting to quite like this model now to be honest, so I'll consider that good progress, and it's a lot of fun to work on, I just keep making little changes that make it slightly worse, and then make little changes that make it slightly better again, trial and error, that kinda thing, all still work in progress and not even vaguely close to being finished, I find it funny that about 95% of the model is painted but I haven't done all that much airbrush work, and I'm not sure whether that's a good thing, or a bad thing...


 Matt


9. Silly Suspension (HVSS)


 Time to do some work on the M4A3 105mm suspension and wheels which have been annoying me a great deal to be honest, so it's a job that I keep pushing further down the list of things that need doing, but anyway, the above picture is a good example of badly damaged Sherman HVSS wheels/tyres, and shows how some of the tyres have broken away in chunks, on the Culebra beach Sherman things are even worse as most of the suspension units themselves have rusted away completely, with most of the damper units and coil springs missing in action or corroded to such a degree that they barely look familiar anymore.


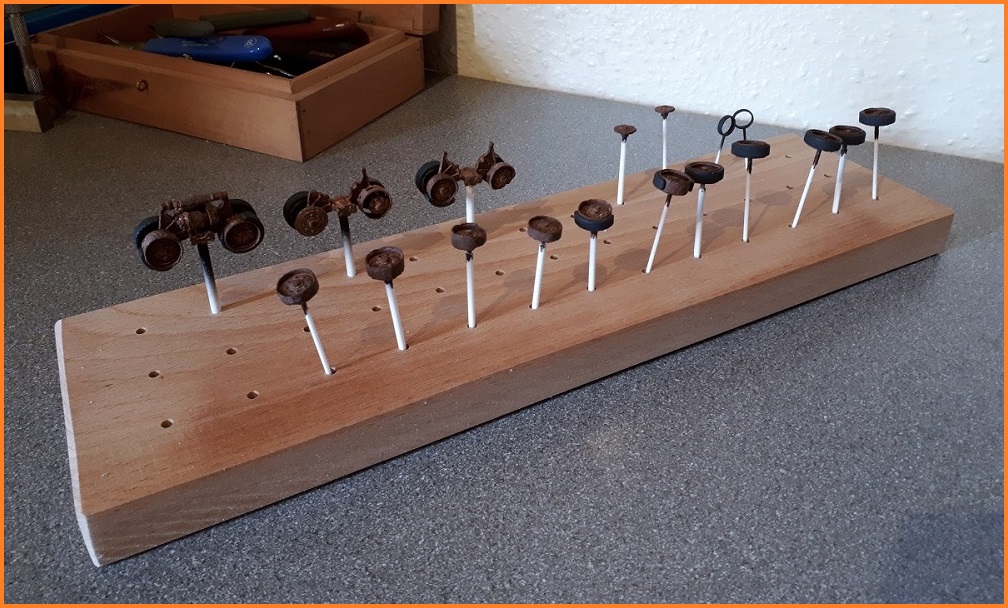
 Picture above, all of the Dragon and Tamiya parts have been mounted on sticks ready for a quick spray with a pre shade of Tamiya flat black before they get the same rusty/dusty stipple paint procedure applied to them, two of the large return rollers have also been butchered with a Mini-craft tool to in effect remove the outer rubber section (tyre) these will then hang from the rusty remains of two of the large return rollers.


 Picture above, the Dragon separately moulded tyres make doing this kind of work a million times easier it has to be said, it's very easy to just add random chunks of tyre to the wheels, and also much easier to paint and fit the fully round tyres, most of the tyres have been fairly heavily distressed and had snicks and cuts put into them, but not all, there are some good tyres left on the Culebra beach wreck, just not very many.


 Picture above, believe it or not, this rusty rotted mess of a suspension unit is one of the better/less corroded ones that can be seen on the Culebra beach wreck, the damper unit at the top has rusted through but still hangs in place, probably because the pivot points have rusted up, this picture highlights another advantage of separately moulded tyres - you can prise away the tyres slightly to leave a little gap, very much like the tyre is just starting to break away from the metal wheel.


 And that's pretty much all the wheels, suspension and tyres sorted out and ready to be fitted back on the lower hull, the tyres were painted with Tamiya NATO black (which is grey) and then given a heavy wash of Tamiya flat black to get them back to being a more blackish colour, but light grey would be ok for sun bleached faded tyres I think.


 Matt


8. The Postman Always Rings Twice

 My postman has actually delivered something nice for a change, normally he just spams me with junk mail, like an email account gone bad, but this time he shoved something useful through the letterbox, and to be a little more specific, the Flamenco Beach (Culebra Beach) masking set that I ordered for this build has turned up, and it seems on first inspection to be very good, which it has to be said shocks me a great deal because normally when I order aftermarket stuff from the big bad web it turns out to be a little bit...rubbish, rubbish is probably a little bit harsh, hit n miss, let's just say hit n miss, and it's even the right scale, which shocked me even more because they do a 1/48th version, and it didn't seem to specify on the website which scale you were actually buying.


 Pictures above and below, I have absolutely no idea who Uschi van der Rosten actually is, but I have however heard of Miracle Masks who it would seem produced the mask set, with old Uschi just being the designer I think? Not sure, he has a website which seems to have quite a large selection of masks and stencils, but maybe focused more on the aero side of things, the mask set contains everything for the most famous version of this Sherman, so yellow and green spiral graffiti for the hull, and fishbones for either side of the turret, plus a few other bits n bobs, and it has to be said that the instructions are living a little on the vague side of life, but who needs instructions! Blokes don't need instructions! (famous last words)


 In terms of actual work on the model I have made a start on sorting out the turret and the upper hull, both of which needed their chaos texture adding using Mr Surfacer Dissolved Putty and some very fine wood dust, I've used artistic license again for most of it, but not as crazy as the lower hull, this time I tried to keep things a little more restrained and follow pictures a teeny tiny little bit, the upper hull got a third pass with a Mini-craft tool and small rotary burs just to clean off some last sharp edges, and then the inside of the upper hull got absolutely murdered in a desperate attempt to remove all the Tamiya moulding marks/pin marks and stuff, because of the very open nature of the model it's very easy to see the inside of the hull, so it all need sorting out.


 Pictures below, the gun breech that I scratch built ages ago has been fitted at long last to the inside of the turret, It does quite a good job of just catching the eye through the open hatches to give the impression of at least something being inside the turret, then it all got stipple painted in the same way as the lower hull, and some slight dusting added as well, and on the right, the inside of the upper hull got the same stipple paint process as everything else has so far, plus this time I added the vague remains of the sponsons before I painted anything, so was able to blend them in better this time around.


 And that's about as far as I've got for now, though I'm working on it a lot more now, wheel and suspension work should really be next I think, I just got a little carried away with the turret, doing some stipple painting and stuff, and things just spiralled from there, the turret really needed sorting out now because I bodged it ages ago with fine grit/sand on the inside while experimenting with textures, and it ended up looking god awful, it doesn't look much better now to be honest, but it's a lot better than it was that's for sure.


 Picture above, If you think of this as a pre shade layer very much like spraying on a coat of black surface primer then it starts to make a little more sense, you just have to get past the fact that the turret is a horrible chocolate brown colour, well for now at least, wheels and suspension work is probably up next as it all badly needs to go back on sooner rather than later.


 Matt


Sunday 26 June 2022

7. Creature Comforts

 The best laid plans of mice and men, yeah the trouble with plans is that they have a bad habit of changing, they morph into...better plans, worse plans, crazy silly nonsense plans, the plan for this has changed so much that I cant even remember what I was doing, let alone what the plan was, I think the original plan for this was to construct the whole model, and then spray it all black (pre shade) with an airbrush, and work from there, with brown and orange shades, which is a fairly sensible plan it has to be said, but I threw that plan out the window, because It's far too...sensible, I wanted to experiment with chaos texture and colour, but all at the same time, plus make life hard for myself, which I tend to do a lot if I'm being honest, mainly because I'm bored stupid with model making these days.


 Picture above left, the large lump of plastic with the two sink marks was removed because it's probably wrong, and with regards to construction, if it looks wrong, then it probably is wrong, there was probably something there that looked vaguely like that once upon a time, but not anymore on this rusty abandoned wreck, so it got removed with a large rotary bur, and the top arrow is pointing at some mildly warped hull sides, which is the result of using poly cement to laminate plastic card onto the inside of the hull, which you should never do as it will always result in some form of warping or crazy bowing in the plastic over time, because poly cement is very aggressive stuff, It's much better to use ca or maybe epoxy, It might not happen straight away, but you just give it a few bloody years.

 But anyway, I had to put some bench bracers in to straighten it all out and get the hull sides vaguely square again, and then make those benches look vaguely like the rusty rotted out remains of a fighting compartment interior, which was not all that successful it has to be said, to me they look like little rusty benches that you could have a sit on, if the mood took you, and talking of moods, the picture on the right is what a hull looks like after you cover it with burnt umber acrylic mixed with rusty pastel shades, very moody and not very nice, but it's a good starting point.


 Picture above, at this point I thought it might be a good idea to scratch some rotted out sponsons from very thin plastic card, It would of been an even better idea had I thought about doing it before I painted the lower hull, but let's not dwell too much on that, I cut them from card, glued them on, and blended them in, and there's not much left of the sponsons to be honest, which is a good thing, as it makes upper hull fitting much easier, and I've used artistic license on these (the horror) In fact I've been using artistic license from the start, but let's not dwell on that either, It doesn't matter, It's all just rusty rotted nonsense.


 Picture above, and talking of rusty and rotted, this is where I've ended up so far with the lower hull, all the suspension units apart from two got cut off again with a rotary bur, It's kind of shocking how good a cut you can get with a rotary bur, It's a lot easier and faster than using some form of fine modelling saw that's for sure, but anyway, the wheels and suspension are all still work in progress, I tend to consider all of this as a starting point to add further effects to later.


 Picture above, this simply shows the new transmission in the front of the hull and the new shape of the back of the hull, which I like much better now, plus absolute chaos in terms of texture, maybe a little over the top, but It doesn't really matter because it's just the lower hull, with the upper hull and turret I might need to be a bit more careful, I can't afford to trash the Dragon turret anyway that's for sure, as there's zero chance of getting another one of those, the rest of it is all expendable and good for experimentation with rusty chaotic texture.


 To be honest I'm still 50/50 on whether I actually like this result on the lower hull, sometimes I like it, and sometimes I don't, It's best to just regard it as a starting point for adding further weathering effects to in the future I think, all the suspension and wheels need to go back on soon, they were all cut off because I changed my mind with regards to painting, I swapped from airbrush to a stipple painting method which meant the wheels and most of the suspension had to come off again.


 Matt